2D FD Poisson Example
In this example we examine the Poisson equation. The Poisson’s equation is an elliptic Partial Differential Equation (PDE) and describes a manifold of phenomena in areas of fluid dynamics, electrostatics, etc.
Introduction
In this example we are solving a Poisson equation using the Finite Difference (FD) discretization. In order to compute an approximate solution for the system of equations that stems from this discretization, we compose a solver using the Multigrid (MG) method.
Problem Description
At first, we take a look at the equation’s continuous formulation on a 2D domain \(\Omega \in [0, 1]^2\).
The right-hand side (RHS) \(f\) is defined as
The values on the boundary \(\delta \Omega\) of \(u\) are set to
i.e. Dirichlet type boundary conditions.
Discretization
As a first step, we discretize the continuous problem. Correspondingly, the physical domain \(\Omega\) is also discretized to the computational domain \(\hat{\Omega}\) using a uniform grid. Here, we apply the FD method to approximate the \(\Delta\) operator. For this purpose, one sets up the Taylor expansions for adjacent grid points. For an exemplary 1D Function \(u : \Omega \mapsto \rm{I \! R}\), evaluated at grid point \(x_i\) with grid cell size \(\Delta x\), calculating the Taylor expansion yields
where \(R(o)\) describes the discretization error of order \(o\).
With these, differential operators such as \(\Delta\) can be constructed. For instance, a first order derivative in 1D with second order accuracy can be approximated using central differences as:
Higher order derivatives can also be build analogously from the Taylor expansion or via the combination of lower-order derivative approximations.
For higher-dimensional problems the process stays the same, but is applied for each dimension individually. The final discrete problem description for the function \(u\) at the 2D grid point with indices \((i, j)\) is
Or in a more compact notation, namely a stencil:
Up to this point, we defined the discrete formulation of the problem we want to solve. The next step is to set up a solver for the arisen system of equations. For this tutorial we chose a MG solver.
Multigrid Particulars
The following two graphics describe the main aspects of the MG method. Fig. 1 depicts the MG algorithm and its components. In short, the main idea behind MG is based on two key principles. The first is the smoothing property of classical iterative methods such as Jacobi and Gauss-Seidel. For these it is observed that they are very suitable to damp high-frequency errors. Low-frequency errors, however, are not damped as efficiently and thus often require high number of iterations for a satisfactory result. The second is the coarse grid principle which states that smooth error functions can be represented satisfactory on coarser grids with. The restriction to the coarser grid also shifts the frequency distribution of the error, which allows for an application of classical iterative methods again. MG combines both principles into a single iterative solver where in the algorithm one traverses between fine and coarse grids in the hierarchy.
pre-smoothingcompute residualrestrict residualrecursionprolongate errorcoarse grid correctionpost-smoothingIn order to calculate the approximate solution for the next iteration
\(u_h^{(k+1)} = MG_h\Big(u_h^{k}, A_h, f_h, \gamma, \nu_1, \nu_2\Big)\)
is executed.
\(\mathcal{S}\) denotes the smoother, often one of the previously named classical iterative methods,
and is first applied to the current solution \(u_h^{k}\) as pre-smoothing steps \(\nu_1\) times to damp high-frequency errors.
Then, the residual term \(r_h\) is computed and restricted \(\mathcal{R}\) to a grid on a coarser level.
Here, the restricted residual \(r_H\) forms the right-hand side of the error equation \(A_H e_H = r_H\) when calling the function recursively, i.e.
\(e_H^j = MG_H\Big(e_H^{(j-1)}, A_H, r_h, \gamma, \nu_1, \nu_2\Big).\)
In this tutorial, our initial guess for \(e_H^0\) is zero.
On the coarsest grid, one can use direct solvers or coarse-grid solvers. One prominent example for the latter is the conjugate gradient (CG) method.
Once returned from the recursive call, the obtained error approximation \(e_H\) is then interpolated or prolongated \(\mathcal{P}\) towards the finer grid.
Here, it is applied as a correction for the approximate solution as the exact solution is the sum of the approximate solution and the error.
At the end, post-smoothing is applied \(\nu_2\) times to smooth high-frequency errors originating from the correction.

Note that depending on the Parameter \(\gamma\), which stands for the number of times the recursion is done per iteration, the grid hierarchy is traversed in a different order. For \(\gamma=1\), this variant is known as V-Cycle, whereas W-Cycles can be obtained with \(\gamma>1\).
Domain Partitioning
Nowadays, modern clusters are typically based on a distributed memory architecture. Thus, when parallelizing an application in order to make use of multiple compute resources, not only work but also data is distributed.
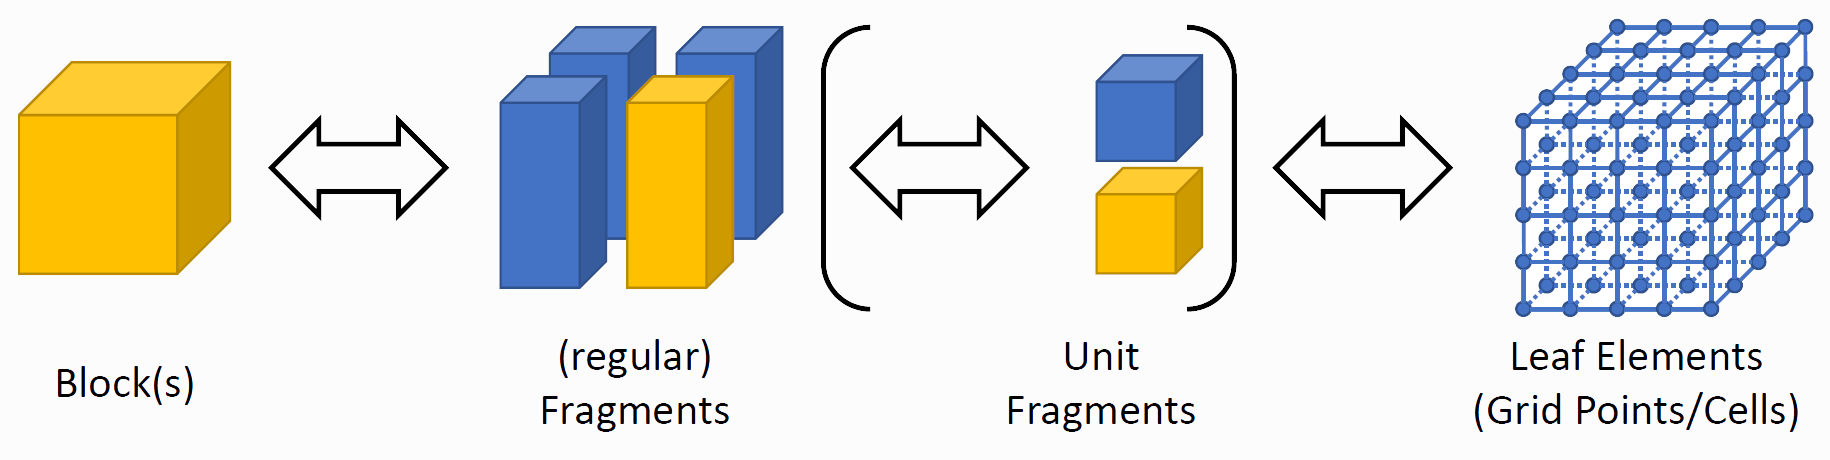
In ExaStencils, the computational domain is partitioned into patches that will be referred as fragments. Thus, the computational grid which is typically tied to the domain is also implicitly partitioned. In order to be a valid partitioning, the union of all fragments must yield the whole domain and fragments are not allowed to overlap. For multiple domains, the condition that fragments shall not overlap must hold for one global domain. For the other domains contained in the global one, this condition must be true for their corresponding sub-set of fragments. Moreover, all fragments must either be fully outside or inside any given domain.
In accordance to the hierarchical architecture and parallelization methods employed in nowadays clusters, ExaStencils introduces another partitioning unit, namely blocks which are at the top of the hierarchy. Each block contains multiple fragments and each fragment belongs to exactly one block.
In layer 4, the concept of fragments is first introduced. Conceptually, on this layer all definitions are regarded in view of a single fragment. Affected are all functions and also any kernel that operates in the iteration space of any given fragment. The benefit of this design is the independency of the number of fragments.
The number of blocks and fragments can be configured in a so-called .knowledge file which will be introduced later.
Program Specification
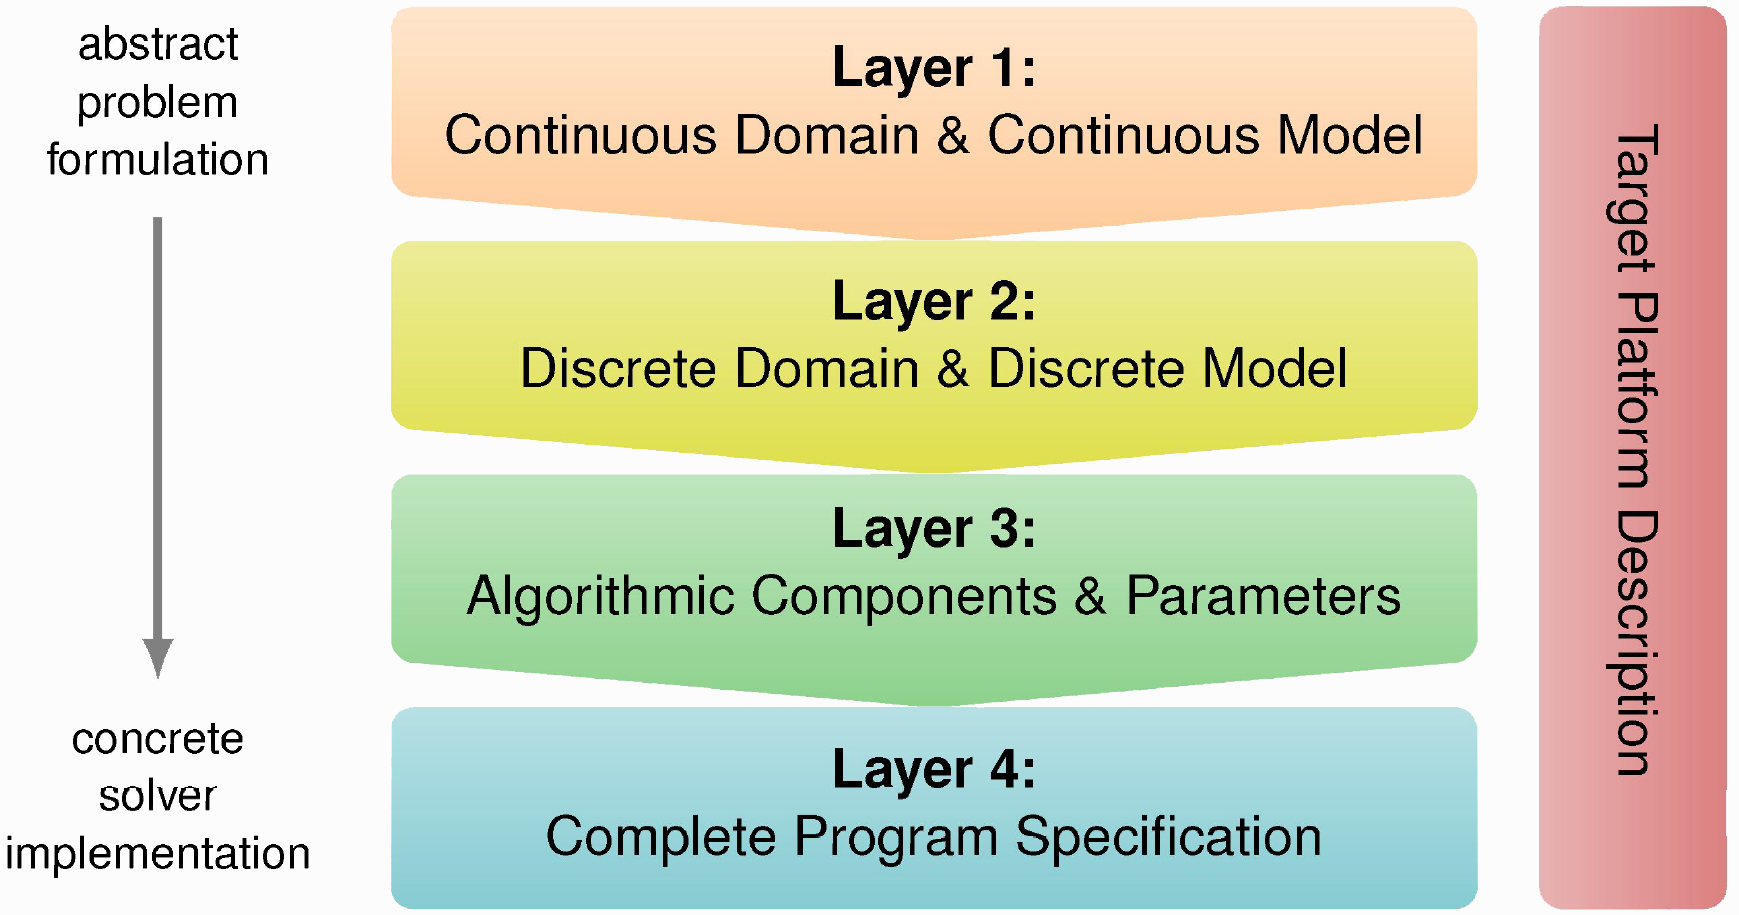
With the theoretical aspects in mind, we now switch to programming using ExaSlang. ExaSlang is a multi-layered DSL geared towards the implementation of MG codes. As shown in Fig. 4, each layer is envisioned to be used for a certain task and can also be assigned to certain user communities. Moreover, the abstraction level of the individual layers differs. Higher levels are more abstract, whereas lower levels become more concrete.
While the implementation of a program can be done by supplying different algorithmic components on different layers, the focus in this tutorial will lie on a program specification solely in ExaSlang layer 4. Therefore, this section gives an overview of ExaSlang 4 and covers important concepts in ExaStencils. Additionally, the various configuration capabilities are demonstrated.
ExaSlang 4 Program
The focal point of this tutorial will be to specify a whole application using ExaSlang4, as it is the most discussed layer in publications and provides a more computer science oriented view on algorithms and data structures. Additionally, it makes concepts such as parallelization, synchronization, etc. accessible to users. Initially, we begin with the declaration of our data structures.
Global Section
Globals {
        Var curIt : Int = 0
        Val maxIt : Int = 0
}
One important language element is the global section, which is mainly used to declare global variables as illustrated above. As the name implies, these variables are globally known throughout the whole ExaSlang program.
Knowledge Object Declarations
As a next step, we declare the knowledge objects that are necessary for our application. In this example, this includes domains, layouts, fields and stencils.
Domain global< [ 0.0, 0.0 ] to [ 1.0, 1.0 ] >
Let’s first start with the declaration of the domain. As can be seen, the declaration of our quadratic problem domain global is rather straightforward.
Namely it is defined by an axis-aligned bounding box with \(x_{min} = y_{min} = 0.0\) and \(x_{max} = y_{max} = 1.0\).
Layout NodeNoComm< Real, Node >@all {
        duplicateLayers = [1, 1]
        ghostLayers     = [0, 0]
}

Layout NodeWithComm< Real, Node >@all {
        duplicateLayers = [1, 1] with communication
        ghostLayers     = [1, 1] with communication
}

Layout NodeNoGhost< Real, Node >@all {
        duplicateLayers = [1, 1] with communication
        ghostLayers     = [0, 0]
}
As a next step, we declare field layouts. To reduce code complexity and overly lengthy field declarations, fields and field layouts have been conceptually separated with the intention that layouts are shared between different fields. Layouts contain information of the underlying data structure. This includes the base datatype and the localization. In this example, we mainly have scalar quantities and the discretization points are located on the grid nodes. In most applications, accessing data of neighboring fragments is necessary and typically handled via ghost layers which essentially hold copies of inner points from adjacent fragments. To allow for a better distinction between the different areas within a field, they are distributed logically into regions. Fig. 5 depicts the different regions supported in ExaStencils, namely (P)adding, (G)host, (D)uplicate and (I)nner.
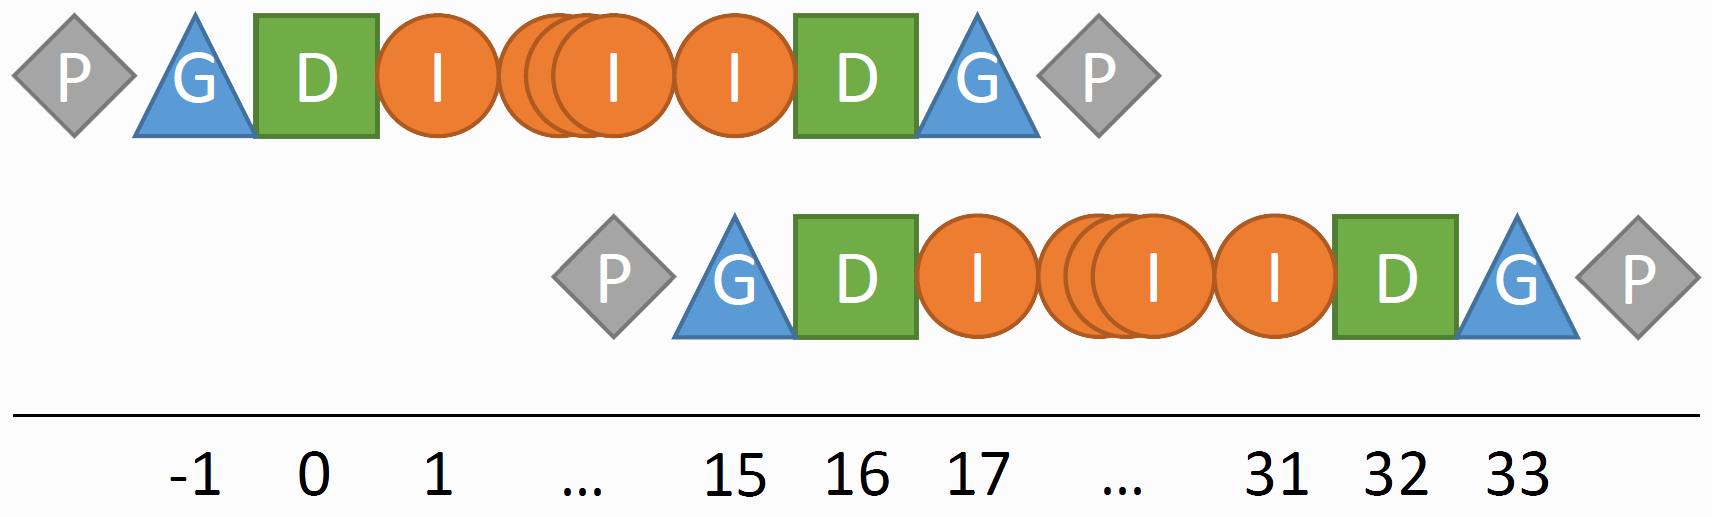
Inner: Mark grid parts owned by a fragment.
Ghost: Copies of inner points from adjacent fragments.
Duplicate: Grid points shared between multiple fragments. Usually located exactly at the fragment interface. Present in all adjacent fragments.
Padding: For aligned vector operations. Usually added automatically by the generator.
In order to mark data regions to be synchronized with neighboring fragments, the with communication option can be used.
Note that field layouts are level specific. Unless specified differently by setting the innerPoints region in a layout, the number of inner grid cells
per dimension in a fragment is typically \(2^{curLevel} * fragmentLength(dim)\) with fragmentLength being a knowledge parameter.
Also note that cell-centered field layouts typically do not have duplicate layers.
So in the case of an automatic deduction of the inner regions, a coarsening factor of 2 is assumed. For the other scenario, this factor can be arbitrarily chosen.
This property also needs to be kept in mind when defining inter-grid operations.
Field Solution< global, NodeWithComm, 0.0 >@(all but finest)
Field Solution< global, NodeWithComm, cos ( PI * vf_boundaryPosition_x ) - sin ( 2.0 * PI * vf_boundaryPosition_y ) >@finest

Field RHS< global, NodeNoGhost, None >@all

Field Residual< global, NodeNoGhost, 0.0 >@coarsest
Field Residual< global, NodeWithComm, 0.0 >@(all but coarsest)

Field cgTmp0< global, NodeWithComm, 0.0 >@coarsest
Field cgTmp1< global, NodeNoGhost, None >@coarsest
Afterwards, fields are declared. Fields can be interpreted as arrays linked to a computational domains and are a common concept in numerical simulations. Besides their domain, these also take the previously introduced layouts and boundary conditions as arguments. Likewise, field declarations are also leveled which allows passing different arguments per level. As can be seen, different boundary conditions and also layouts can be chosen for each level depending on the user’s requirements. Optionally, multiple field instances can be generated when providing field slots as demonstrated in the following:
Field unusedSlottedField< global, NodeNoGhost, None >[2]@all
The requested instance can then be accessed via slot modifiers. This feature is especially useful for algorithms that utilize Jacobi-type smoothers or time-stepping schemes. However, this feature is not used in this tutorial.
Stencil Laplace@all {
        [ 0,  0] =>  2.0 / ( vf_gridWidth_x ** 2 ) + 2.0 / ( vf_gridWidth_y ** 2 )
        [-1,  0] => -1.0 / ( vf_gridWidth_x ** 2 )
        [ 1,  0] => -1.0 / ( vf_gridWidth_x ** 2 )
        [ 0, -1] => -1.0 / ( vf_gridWidth_y ** 2 )
        [ 0,  1] => -1.0 / ( vf_gridWidth_y ** 2 )
}
In ExaStencils, stencils can be defined as in the snippet above. Here, the stencil entries are provided in form of offset entries, that is, when the stencil is applied to a given grid point, the coefficients of the accessed neighboring field values are specified. In this example, we define a stencil for FD approximation of the \(\Delta\) operator. Alternatively, stencils can also be composed from expressions that evaluate to a stencil, i.e. stencils from expressions. For example, this could be the addition of two stencils.
Stencil NodeRestriction@all {
        [i0, i1] from [2.0 * i0 - 1.0, 2.0 * i1 - 1.0] with 0.0625
        [i0, i1] from [2.0 * i0 - 1.0, 2.0 * i1      ] with 0.125
        [i0, i1] from [2.0 * i0 - 1.0, 2.0 * i1 + 1.0] with 0.0625
        [i0, i1] from [2.0 * i0,       2.0 * i1 - 1.0] with 0.125
        [i0, i1] from [2.0 * i0,       2.0 * i1      ] with 0.25
        [i0, i1] from [2.0 * i0,       2.0 * i1 + 1.0] with 0.125
        [i0, i1] from [2.0 * i0 + 1.0, 2.0 * i1 - 1.0] with 0.0625
        [i0, i1] from [2.0 * i0 + 1.0, 2.0 * i1      ] with 0.125
        [i0, i1] from [2.0 * i0 + 1.0, 2.0 * i1 + 1.0] with 0.0625
}

Stencil NodeProlongation@all {
        [i0, i1] from [0.5 * ( i0 + 1.0 ), 0.5 * ( i1 + 1.0 )] with 0.25
        [i0, i1] from [0.5 * ( i0 + 1.0 ), 0.5 *   i1        ] with 0.5
        [i0, i1] from [0.5 * ( i0 + 1.0 ), 0.5 * ( i1 - 1.0 )] with 0.25
        [i0, i1] from [0.5 *   i0,         0.5 * ( i1 + 1.0 )] with 0.5
        [i0, i1] from [0.5 *   i0,         0.5 *   i1        ] with 1
        [i0, i1] from [0.5 *   i0,         0.5 * ( i1 - 1.0 )] with 0.5
        [i0, i1] from [0.5 * ( i0 - 1.0 ), 0.5 * ( i1 + 1.0 )] with 0.25
        [i0, i1] from [0.5 * ( i0 - 1.0 ), 0.5 *   i1        ] with 0.5
        [i0, i1] from [0.5 * ( i0 - 1.0 ), 0.5 * ( i1 - 1.0 )] with 0.25
}
For inter-grid operations, such as the restriction and prolongation of two successive grids in the grid hierarchy, we also declare stencils. In contrast to the previous snippet, mapping entries were used for this purpose. Note that there are also stencils from default deduced from a specific default case. These allow for a more compact formulation of stencils for inter-grid operations. Again, note that these kinds of stencils also leveled. While these can be defined for each level, it is not necessarily implied that these operations are valid. One example is the prolongation operation applied on the finest level as it would map onto an invalid level. Also, for the prolongation only entries that yield a valid index for the current grid point \((i0, i1)\) are taken into account. So, for instance, the uppermost stencil entry in the declaration is only applied when \(i0\) and \(i1\) are both odd.
Functions
Now lets get more into the specification of our program. Layer 4 follows the paradigm of procedural programming and provides common language elements like
functions,
inner statements such as loops,
expressions, etc.
As shown in the code block below, it is also possible to declare an Application function which corresponds to the main function in the C/C++ target code.
The highlighted lines emphasize functions that will be generated automatically, i.e. the user needs not to define them.
In most applications data is first initialized.
Function Application {
        // init
        initGlobals ( )
        initDomain ( )
        initFieldsWithZero ( )
        initGeometry ( )
        InitRHS@finest ( )
        apply bc to Solution@finest

        // solve
        Solve@finest ( )

        // de-init
        destroyGlobals ( )
}
This includes the initialization of global variables, i.e. the initGlobals function which, apart from the ones defined by the user,
also initializes variables that are not directly visible in ExaSlang specifications.
These are the so-called Internal Variables (IVs) which need to be accessible and modifiable in the generated code.
One example is an IV required to keep track of a field’s active slot.
Note that these are often defined per field, level and/or domain.
Moreover, domain-specific variables containing geometrical and topological information
such as the position of a fragment and it’s connectivity to the other fragments are set in initDomain.
Once this is done, the setupBuffers function is called internally where the memory buffers for the fields are then allocated.
Subsequently, the initGeometry function is responsible for initializing so-called virtual fields that contain geometrical information
such as the node positions, the cells’ centers and widths, and more. These are called virtual since depending on the employed grid
different amounts of data is required to be stored, i.e. in form of an actual field being deployed or not.
For instance, for uniform meshes the node positions can be easily derived via the constant cell width,
whereas for non-uniform & non-axis-aligned meshes positional data for each discretization point is necessary.
Therefore, ExaStencils minimizes the memory to be allocated and only stores the information when required.
Afterwards, the right-hand side is initialized. For this purpose, the following function below can be used.
Here, a so-called field loop is employed to
set the inner points of RHS according to the formula specified in our problem description.
Note that the level specification for the field loop and field accesses has been omitted,
since @current is already implicitly assumed.
In case that you want to program more verbosely, you can always write down level accesses explicitly.
Function InitRHS@finest {
        loop over RHS {
                RHS = PI**2 * cos ( PI * vf_nodePos_x ) - 4.0 * PI**2 * sin ( 2.0 * PI * vf_nodePos_y )
        }
}
In this application, the solver is then executed until either a satisfactory result is computed or the maximum number of iterations was exceeded.
Lastly, the allocated memory is freed via destroyGlobals.
Next, we compose our solver. To recapitulate the MG algorithm, the implementation on the coarsest level is different to ones above. On the coarsest level, no recursive calls are made but our system of equations is solved. This can be done with a direct solver, but is not advisable when performance is a critical aspect. Thus, a so-called coarse grid solver is employed. While there are several variants, this tutorial’s focal point will be the CG method, whose algorithm for solving a system of equation \(Ax = b\) is listed below.
Show/Hide Coarse Grid Solver Code
Function mgCycle@coarsest {
        // r^0 = b - Ax^0
        communicate Solution
        loop over Residual {
                Residual = RHS - Laplace * Solution
        }
        apply bc to Residual

        // for exit criterion
        Var curRes : Real = ResNorm ( )
        Var initRes : Real = curRes

        // p^0 = r^0
        loop over cgTmp0 {
                cgTmp0 = Residual
        }
        apply bc to cgTmp0

        Var curStep : Integer = 0
        repeat 128 times count curStep {
                communicate cgTmp0

                // A * p^k
                loop over cgTmp1 {
                        cgTmp1 = Laplace * cgTmp0
                }

                // alphaNom = r^k dot r^k
                Var reductionVar_2 : Real = 0.0
                loop over Residual with reduction ( + : reductionVar_2 ) {
                        reductionVar_2 += Residual * Residual
                }
                Var alphaNom_Solution : Real = reductionVar_2

                // p^k dot A * p^k
                Var reductionVar_3 : Real = 0.0
                loop over cgTmp0 with reduction ( + : reductionVar_3 ) {
                        reductionVar_3 += cgTmp0 * cgTmp1
                }
                Var alphaDenom_Solution : Real = reductionVar_3

                // alpha = alphaNom / alphaDenom
                Var alpha : Real = alphaNom_Solution / alphaDenom_Solution

                // x^{k+1} = x^k + alpha^k p^k
                loop over Solution {
                        Solution += alpha * cgTmp0
                }
                apply bc to Solution

                // r^{k+1} = r^k - alpha^k Ap^k
                loop over Residual {
                        Residual -= alpha * cgTmp1
                }
                apply bc to Residual

                // exit criterion
                Var nextRes : Real = ResNorm ( )
                if ( nextRes <= 0.001 * initRes ) {
                        return
                }

                // beta^k = (r^{k+1} dot r^{k+1}) / (r^k dot r^k)
                Var beta : Real = ( nextRes * nextRes ) / ( curRes * curRes)

                // p^{k+1} = r^{k+1} + beta^k p^k
                loop over cgTmp0 {
                        cgTmp0 = Residual + beta * cgTmp0
                }
                apply bc to cgTmp0

                curRes = nextRes
        }
        print ( "Maximum number of cgs iterations (", 128, ") was exceeded" )
}
The code snippet above shows the implementation of the algorithm on layer 4. The corresponding steps of the algorithm are listed as comments in the Layer 4 program.
For parallel applications, it is important to periodically synchronize data from neighboring fragments in order to achieve correct results. Since the point of time and the selection of data to be exchanged strongly depends on the application, ExaSlang4 introduced communicate statements to trigger the data exchange of regions within a field. Note that also asynchronous communication is possible. Another new statement that has not been covered yet is apply bc, which activates the application of the boundary conditions that were set in the field declaration.
In the coarse grid solver, the exit criterion is fulfilled when the current residual norm is one thousandth of the initial state. As in most programming languages, condition and return statements can be used to implement an early exit. Since calculating the residual norm will occur in multiple code locations, we encapsulate the necessary steps in the function below. Again, for parallel applications, this value needs to calculated globally and thus requires data to be exchanged. For this purpose, a reduction can be applied.
Function ResNorm@(coarsest and finest) : Real {
        Var norm : Real = 0.0
        loop over Residual with reduction ( + : norm ) {
                norm += Residual * Residual
        }
        return sqrt ( norm )
}
Now, we cover the MG-Cycle’s implementation for the other levels. In this example, we chose \(\gamma = 1\), i.e. a V-Cycle.
Function mgCycle@(all but coarsest) {
        // pre-smoothing
        Smoother@current ( )

        // calc. residual
        communicate Solution
        loop over Residual {
                Residual = RHS - Laplace * Solution
        }
        apply bc to Residual

        // restrict residual. residual is rhs of error equation
        communicate Residual
        loop over RHS@coarser {
                RHS@coarser = NodeRestriction * Residual
        }

        // setting the initial guess for (e_H)^0 to zero
        loop over Solution@coarser {
                Solution@coarser = 0.0
        }
        apply bc to Solution@coarser

        // recursion
        mgCycle@coarser ( )

        // prolongate error and correct
        communicate Solution@coarser
        loop over Solution {
                Solution += NodeProlongation@coarser * Solution@coarser
        }
        apply bc to Solution

        // post-smoothing
        Smoother@current ( )
}
Note that there are slight differences between the previously shown (and more general) MG algorithm and the layer 4 code. The algorithmic steps associated to a statement block in the code are denoted in form of comments.
Furthermore, our smoother function is defined as follows:
Function Smoother@(all but coarsest) {
        repeat 3 times {
                color with {
                        ( i0 + i1 ) % 2,
                        communicate Solution
                        loop over Solution {
                                Solution += 0.8 / diag ( Laplace ) * ( RHS - Laplace * Solution )
                        }
                        apply bc to Solution
                }
        }
}
Here, we employ a Red-Black Gauss-Seidel (RBGS) solver, where unknowns are colored in a checkerboard fashion such that there are no data dependencies between unknowns in a set. Consequently, updating the unknowns is done in multiple steps, where there is one step for each color. As a result, only the unknowns of one color are updated in each step and can be done in-place and in parallel. For this purpose, ExaStencils introduced color statements. Pre- and post-smoothing is applied \(\nu_1 = \nu_2 = 3\) times. This repetition is implemented via a repeat statement.
Finally, we compose our solver function.
Function Solve@finest {
        communicate Solution
        loop over Residual {
                Residual = RHS - Laplace * Solution
        }
        apply bc to Residual

        Var initRes : Real = ResNorm ( )
        Var curRes : Real = initRes
        Var prevRes : Real = curRes

        if ( getKnowledge ( 'testing_enabled' ) ) {
                if ( getKnowledge ( 'testing_printRes' ) ) { printWithReducedPrec ( initRes ) }
        } else {
                print ( "Starting residual: ", initRes )
        }

        repeat until curIt >= maxIt || curRes <= 1.0E-10 * initRes {
                curIt += 1
                mgCycle ( )

                PrintError@finest ( )

                communicate Solution
                loop over Residual {
                        Residual = RHS - Laplace * Solution
                }
                apply bc to Residual

                prevRes = curRes
                curRes = ResNorm ( )

                print ( "Residual after", curIt, "iterations is", curRes, "--- convergence factor is", curRes / prevRes )
        }
}
Initially, we compute our residual term on the finest level after RHS has been initialized and the boundary condition of Solution was applied.
In essence, the solver iteratively completes a V-Cycle, compares our approximated solution with its analytical solution and computes the residual term afterwards.
Similar to the coarse grid solver, we define our exit criterion such that the solver terminates when the residual norm is sufficiently small,
in this case \(1 / 10^{10}\) of the initial state. In case that this cannot be achieved, we cap the number of iterations to our global variable maxIt.
As shown in the PrintError function below print statements, which accept a list of expressions as argument, can be used in order to get more insight of the simulation’s status.
Function PrintError@finest {
        Var norm : Real = 0.0
        loop over Solution with reduction ( max : norm ) {
                norm = max ( norm, fabs ( Solution - ( cos ( PI * vf_nodePos_x ) - sin ( 2.0 * PI * vf_nodePos_y ) ) ) )
        }

        print ( "The maximum error is", norm )
}
Configuration
In ExaStencils, the generation process can be steered via additional auxiliary files containing
parameters in form of identifier = value, where the value can be of type Boolean, Int, Double, String or collections of one of them.
These can be set as follows:
- Scalar parameters:
Simple assignments in the form
identifier = value
- List parameters:
Assignment to list in curly braces, i.e.
identifier = {value1, value2, ...}Assignment to a single value which is assumed to be list of one element
Appending a single value via compound assignment, i.e.
identifier += value
Note that parameters holding strings can also contain values of other parameters via $identifier$ operator, e.g.:
configName = "2D_FD_Poisson"
outputPath = "../generated/$configName$/"
Moreover, since these files often tend to be big, ExaStencils also provides an include mechanism, e.g.
import '../lib/parallelization_pureOmp.knowledge'.
Knowledge
In general, .knowledge files are used to configure the generated target code.
Its parameters target various layers of ExaStencils.
This includes the domain partitioning, paralellization, automatic optimizations, performance estimations, MG levels and many others.
The collection of all knowledge parameters can be found here.
The knowledge parameters set for this tutorial are:
dimensionality                 = 2

minLevel                       = 0
maxLevel                       = 5

experimental_generateParaviewFiles = true

discr_type                     = "FiniteDifferences"

// omp parallelization on exactly one fragment in one block
import '../lib/domain_onePatch.knowledge'
import '../lib/parallelization_pureOmp.knowledge'
Settings
The .settings file is mainly used to specify the in- and output of the generator.
This includes the path to the DSL input file(s), which can be set with lXfile, where X stands for one of the ExaSlang layers (1 to 4) - in our case 4.
Note that lXfile is a parameter list, which allows for multiple inputs per DSL layer.
To simplify the navigation in the file system, the basePathPrefix can be set and will be pre-pended to the other paths.
The destination directory for the output can be set via outputPath. Additionally, users can provide a name for the binary.
To facilitate the compilation of the target code, ExaStencils provides generators for Makefiles, Visual studio projects or CMake files.
The generation can be enabled by setting the required compilation back-ends in the buildfileGenerators parameter list.
Furthermore, external code can be added to the build process via:
pathsIncandpathLibadditionalIncludes,additionalFilesandadditionalLibs
where the files in additionalFiles are added to the compilation stage and additionalLibs are linked after this stage.
For debugging purposes, debugLXFile can be set to output a snapshot of the generation pipeline.
In addition, produceHtmlLog can be set to produce an HTML log file located at htmlLogFile.
user                = "Guest"

configName          = "2D_FD_Poisson_fromL4"

basePathPrefix      = "./Poisson/"

l4file              = "$configName$.exa4"

debugL1File         = "../Debug/$configName$_debug.exa1"
debugL2File         = "../Debug/$configName$_debug.exa2"
debugL3File         = "../Debug/$configName$_debug.exa3"
debugL4File         = "../Debug/$configName$_debug.exa4"

htmlLogFile         = "../Debug/$configName$_log.html"
outputPath          = "../generated/$configName$/"

produceHtmlLog      = true
timeStrategies      = true

buildfileGenerators = { "MakefileGenerator" }
Platform
A .platform file provides parameters for the characterization of the employed hardware and software components.
- Hardware:
hw_numNodes: restrict execution of target code to number of nodeshw_numNodesAvailable: unused, mere annotation- For each node
hw_cpu_name: unused, mere annotationhw_cpu_numCPUs: number of CPUshw_cpu_numCoresPerCPU: number of cores per CPUhw_cpu_frequency: Clock ratehw_cpu_bandwidth: Main memory bandwidth
- GPU:
hw_gpu_namehw_gpu_numDeviceshw_gpu_numCoreshw_gpu_frequencyhw_gpu_bandwidthhw_cuda_capability&hw_cuda_capabilityMinor, e.g. 5 & 4, respectively -> compute capability = 5.4
- Software:
targetOS: Operating systemtargetCompilerMicrosoft visual C++ (MSVC) compiler
GNU compiler collection (GCC)
IBM XL compilers
Intel C++ compiler (ICC)
Cray C++ compiler
PGI C++ compiler
CLANG
targetCompilerVersion&targetCompilerVersionMinormpi_variant
Furthermore, for special target clusters, the targetName parameter can be set in order to trigger the generation of a tailored job script.
Code Generation
The files that are necessary for the generation of C++ code from the ExaSlang4 specification in this tutorial are:
- ./Poisson/2D_FD_Poisson_fromL4.knowledge
maxLevel must be set to 5 to reproduce the results below
./Compiler.jar: Instructions on how the compiler is built can be found here
The directory structure should look like this:
You can then begin the generation process by calling the compiler as shown in the following:
mkdir debug
mkdir generated

java -cp Compiler.jar Main ./Poisson/2D_FD_Poisson_fromL4.settings ./Poisson/2D_FD_Poisson_fromL4.knowledge ./lib/linux.platform > ./debug/generate_output.txt
Once the generation has finished, the target code can then be found in the ./generated/2D_FD_Poisson_fromL4 folder.
There, the code can be compiled and run as shown below.
cd ./generated/2D_FD_Poisson_fromL4
make -j 8
./exastencils
Additionally, files for debugging purposes can be found in ./debug.
The corresponding output from the simulation is captured in the following table:
Residual Norm
Max. Error
Convergence Factor
11984.6
0.137494
357.807
0.0078989
0.0298556
16.9605
0.00263884
0.0474011
0.988294
0.00293013
0.0582705
0.0630082
0.00295729
0.0637545
0.00420487
0.0029592
0.0667354
0.000287557
0.00295933
0.0683867
1.99343e-05
0.00295934
0.0693228
1.39285e-06
0.00295934
0.0698718
9.77859e-08
0.0702059
Extensions
In this section, we demonstrate how our 2D Poisson application can be further extended with important features such as timing and visualization capabilities.
Timing
startTimer ( "application")

startTimer ( "setup" )
// code block ...
stopTimer ( "setup" )

startTimer ( "solve" )
// code block ...
stopTimer ( "solve" )

stopTimer ( "application" )

// ...

if ( !getKnowledge ( 'testing_enabled' ) ) {
        printAllTimers ( )
}
For time measurements, ExaStencils provides the startTimer and stopTimer statements which
both accept an identifier as argument. The time that passed within the interval between the startTimer and stopTimer
statements with the same identifier will then be output to console via printAllTimers ( ).
Alternatively, this can also be output a a file via printAllTimersToFile ( ) where the output file name can be modified via the timerOutputFile settings parameter.
Visualization
In order to be able to visualize the produced output files via ParaView, setting the knowledge flag experimental_generateParaviewFiles = true is necessary. Furthermore, this also requires minor additions to the ExaSlang4 program. The snippet below demonstrates how the solver can be extended to print a visualizable CSV file before each MG cycle.
Function Solve@finest {
        // ...

        repeat until curIt >= maxIt || curRes <= 1.0E-10 * initRes {
                Var str : String
                buildString ( str, "output_", curIt, ".txt" )
                printField ( str, Solution@finest )
                // ...
        }
}
By following the guidelines from ParaView, these tables can then be displayed as points or structured grids. The video below depicts the approximate solution \(u_h(x,y)\) on the finest mesh before each executed MG cycle.